- Manage Host Account:

- The first thing you want to do is create another SuperUser account and then retire the default host account. It's a prudent security measure in any software installation to retire default administrative accounts to thwart dubious hacking efforts. At a minimum, you'll want to change the password for the default host account, although you can delete it entirely.
- Configuring Your Host
- Site Configuration
- Host Details
Host Details Settings Setting
Description
Host Portal
This drop-down selection identifies which portal in the installation is to be considered the default. The default portal attributes are used where no other portal context can be determined. For example, when an invalid URL is used to reach the installation, the request is answered on the first alias of the specified Host Portal.
Host Title
This value is used to populate the text for the [HOSTNAME] skin token.
Prior to version 3.0, you could see the [HOSTNAME] skin token in action on the bottom of the default skin. It was often imposed by the host as a means of injecting a "powered by" link into each portal's skin.
Host URL
Specifies the link target for the [HOSTNAME] skin token. (This is not the same as an alias for the default portal.)
Host Email
Most e-mail in DotNetNuke is sent to or from the individual Portal Administrators. However, there are a few specific cases where the Host e-mail address is used (for example, an SMTP configuration test, a [HELP] skin token, and so on).
- Appearance
Appearance Settings Option
Description
Show Copyright Credits
Inserts the DotNetNuke version number into the browser's title bar and populates the [DOTNETNUKE] skin object. In the default skin, this is displayed as a small thin bar across the bottom of the page that shows the DotNetNuke copyright (see the bottom of Figure 5-3).
Use Custom Error Messages
Specifies whether DotNetNuke or ASP.NET will intercept module errors. If this option is selected, DotNetNuke displays only basic friendly messages to non-Admin users. If the user is an Admin (or Host) user, full error information is made available. Figures 5-4 and 5-5 illustrate the difference between the same error messages presented to Users and Administrators/SuperUsers, respectively. Detailed information is also retained in the error log.
Host Skin
If a skin is not specified in the portal Site Settings, this skin is used as the default for each page where a skin is not explicitly specified in Page Settings.
The Host Skin, Host Container, Admin Skin, and Admin Container settings work exactly like their counterparts in the Portal Administrators Site Settings. For more detail, see Chapter 4.
Host Container
If a container is not specified in the portal Site Settings, this container is used as the default for each module where a container is not explicitly specified in Module Settings.
Admin Skin
If a skin is not specified in the portal Site Settings, this skin is used as the default for Admin pages.
Admin Container
If a container is not specified in the portal Site Settings, this container is used as the default for modules on every Admin page.
Upload Skin
Uploading a skin from the Host Settings loads it into the Host's default folder, which makes it available to all portals. This is in contrast to uploading from Site Settings, where it loads into the Portal Root folder. Skins uploaded from Host Settings are located in \Portals\_default\Skins.
Upload Container
Uploading a container from the Host Settings loads it into the Host's default folder, which makes it available to all portals. This is in contrast to uploading from Site Settings, where it loads into the Portal Root folder. Containers uploaded from Host Settings are located in \Portals\_default\Containers.
- Payment Settings
Payment Settings Setting
Description
Hosting Fee
Represents a default monthly charge associated with hosting a portal. This value is displayed on the Host's list of portals and is applied to new portals at the time of their creation. It can also be specified within a portal template, which would override this default value. If subscription renewal is activated, this fee is used for the monthly renewal rate.
Hosting Currency
Default host currency is used in conjunction with the specified Payment Processor (for example, as a required parameter for PayPal processing). This value is applied to new portals at the time of their creation but can also be overridden within a portal template.
Hosting Space (MB)
Specifies a default disk space limit for new portals. As with many other portal values, it can be overridden in a portal template. It is an enforced limit that's displayed at the base of the File Manager in the Portal Administrators view.
As Host, you can change this value in the Site Settings for a specific portal.
Demo Period (Days)
If Anonymous Demo Signup is enabled, the Expiry Date for a new portal is set this many days into the future.
As Host, you can change this value in the Site Settings for a specific portal.
Anonymous Demo Signup
This is a legacy feature and its use is highly discouraged.
If this option is disabled, only the Host Administrator can create a new portal. If enabled, anonymous users can sign up and immediately log in as Portal Administrator to their own child portal. You have to create your own link somewhere to reach the signup page, but you can copy it from your browser's address bar after clicking Add New Portal on the Portals page. It should have a form like one of the following (depending upon your FriendlyUrls settings):
-
http://soccer.dotnetnuke.com/Default.aspx?tabid=17&ctl=Signup&mid=321
-
http://soccer.dotnetnuke.com/tabid/17/ctl/Signup/mid/321/Default.aspx
This page is not illustrated specifically, but it uses the same control as standard portal signup, which is shown later in Figure 5-12.
A legacy feature of DotNetNuke, this setting was originally provided to showcase the capability of DotNetNuke to host private portals for potential clients. Although it's still supported in version 4.0, it is not without its share of legacy issues. Demo signup is enabled through-out the installation, not just on the Host Portal, so a clever anonymous user who locates a DotNetNuke site might try the demo portal signup. The Portal Root ensures file separation and the host File Upload Extensions setting protects from unsafe files, but a malicious user who finds your site could use you as an anonymous download location for the duration of the demo period (or until you catch him or her). Further, because the user chooses the child portal name, you could wind up with unpleasantly named folder paths indexed by search engines that you would rather not have. Because demo signup creates the user as Portal Administrator, a valid e-mail address is not even required.
-
- Proxy Settings
In general, DotNetNuke should not require specific Proxy Settings. However, some modules may address additional ports for which Proxy Settings are required in your environment (for example, RSS, FTP, NNTP, and so on). Standard settings are configurable for the Proxy Server Name, Port, UserID, Password, and Timeout duration.
- SMTP Server Settings
In hosting situations, the web server itself often runs a simple SMTP service for handling outbound e-mail generated by web sites. Although this setup initiates outbound e-mail, that mail is often flagged as SPAM by the target domains (especially domains like Hotmail.com, Yahoo.com, and so on). For best results, the SMTP server you specify should be the one in the MX record for your domain. Depending on your SMTP server's configuration, it may be necessary for Portal Administrators' e-mail addresses to be recognized on the server as well.
If you are testing from a home network via a broadband connection, be aware of your ISP's policies regarding SMTP servers. Generally speaking, most ISPs do not allow the trafficking of e-mail from other SMTP servers on their networks (as a SPAM control measure). You either need to configure DotNetNuke to use the credentials of your ISP account (just as you would in your local e-mail client) or configure a local SMTP server to relay through your ISP and specify that local server in DotNetNuke.
- Other Advanced Settings
-
Setting
Description
Control Panel
Select the Control Panel that Portal Administrators will use. Chapter 4 contains a full description of the choices.
The capability to select the Control Panel exists largely to promote the concept of creating customized Control Panels for the host. If you created your own Control Panel, what would you make it look like?
Site Log Storage
Enables you to specify whether site log information is stored in the database or in files. File-based logs are written using the IIS 6 log conventions and are stored in the each portal folder with the following naming convention: / portals/
/logs/ex .log. The database option is specified by default. Site Log Buffer (Items)
This value defines the number of site log entries that are held in memory before storing them. Setting the buffer to 0 turns logging off entirely.
Changing the buffer value does not affect the actual I/O cost of logging, but it does change where and when the cost is incurred. For example, if the log buffer is set to 1, every page request in every portal will incur the (slight) overhead of the log I/O, whereas if the log buffer is set to 20, only 1 in 20 requests will incur the overhead, but it will incur the overhead of all 20 I/O requests.
If the cache is cleared (whether by the restart of the application, in Host Settings, or by other means), any uncommitted items in the log buffer are lost.
Individual buffers are cached for each portal, but this setting applies globally to all of them. Setting this value too high could result in data loss for low traffic sites whose cache might expire (and be lost) before reaching the buffer threshold.
Site Log History (Days)
DotNetNuke performs site logging on an individual portal level and retains that information for the number of days specified. This value represents the default duration that will be applied to each new portal created. Changing this value has no effect on the configuration of existing portals, although as Host, you can change this value in the Site Settings for a specific portal.
Expiration of site log data is contingent upon execution of a scheduled job, which periodically truncates the buffer to the duration specified. The PurgeSiteLog job must be enabled in the Scheduler for this to occur; otherwise the SiteLog table can grow unchecked. Job scheduling is covered later in this chapter.
Disable Users Online
UsersOnline is a popular functionality in many online portal applications, tracking and displaying the number of users registered on the site, how many users are currently using the site, and so on. However, this functionality imposes unnecessary processing overhead on each page request for sites that don't need it. By checking this option, logic within DotNetNuke that populates UsersOnline tracking tables and cache objects is bypassed for the entire installation.
Setting this option is only half the process required to enable or disable UsersOnline. An essential part of UsersOnline is a corresponding scheduled job that performs periodic cleanup on the associated AnonymousUsers and UsersOnline database tables. If this job is enabled without UsersOnline in use, it is an unnecessary drain on system resources. Conversely, if it is not enabled when UsersOnline is in use, these tables grow unchecked. Job scheduling is covered later in this chapter.
Users Online Time (Minutes)
UsersOnline tracks the presence of users who have been active on the system within this time period. When the scheduled job runs to clear the tracking tables, it uses this time period as a basis for determining which records to clear.
UsersOnline does not track or log personal information and is not a mechanism for "spying" on users. It makes temporary note of who is logged in, what page they are currently visiting (no history), and how many anonymous users are currently viewing the site. The data is deleted after this duration has passed.
Auto-Unlock Accounts After (Minutes)
As a security measure to thwart hacking attempts, DotNetNuke locks out a user account after a series of unsuccessful login attempts. Such an account can be automatically unlocked with a successful authentication after a certain period of time has elapsed. This value is the number of minutes to wait until the account is automatically unlocked. Enter 0 to disable the auto-unlock feature.
File Upload Extensions
This comma-separated list specifies the file extensions that are permissible through the File Manager. It comes prefilled with a variety of common "safe" file extensions and can be fully customized.
The file management utilities within the portal are "intelligent" and reference this allowable file list. For example, a file that is renamed in the File Manager cannot be renamed with an invalid file extension. Likewise, files with invalid file extensions are ignored when an uploaded zip file is unpacked.
Skin Upload Permission
You can enable Portal Administrators to upload skin and container files by selecting Portal. To restrict them from uploading skin and container files, select Host.
Module Caching Method
Module instances have a Cache Time setting that can be modified to improve performance in relatively static modules. This setting controls whether module caching is performed on disk or in memory. Memory caching provides the most flexibility and is the highest performance method, but it also consumes the most system resources.
When this option is enabled, HTML files are created and stored on the file system in the following format:
Performance Setting
A variety of cache objects in DotNetNuke provide for increased performance. They do not all have the same duration. They expire based on their specific functionality — for example, User objects expire more often than Portal objects. Changing this setting applies a common multiplier that affects their relative duration (or lifespan). The duration is enforced within DotNetNuke, but it's still subject to external settings that govern the site (such as recycling the ASP.NET worker process). Moderate caching is the default setting.
The No Caching option is primarily developer-or support-oriented. Without the benefit of the caching features of ASP.NET, the amount of work performed on each page request renders DotNetNuke slow to run and is not recommended. However, this option can be useful in tracking down a caching-related issue.
Clear Cache
Enables the Host to manually clear the cache on demand. Generally this is not required; however, as Host, you typically have access to manipulate database tables directly. Table updates applied this way bypass the application and may not be reflected until the cache is updated. You can force an update of cache to reflect your manual changes by clearing it. (Clearing the cache this way also dumps buffered logs, so it should be performed only when necessary.)
Scheduler Mode
The Timer Method maintains a separate thread to execute scheduled tasks while the worker process is alive. Alternatively, the Request Method triggers periodic execution of tasks as HTTP Requests are made. You can disable the Scheduler by selecting Disabled. The Scheduler is examined in detail later in this chapter.
Enable Event Log Buffer?
Like the site log, the event log can also be buffered for performance to avoid the overhead associated with logging I/O on every request. If checked, this setting causes event log entries to be buffered into cache and periodically written to the data store. If unchecked, log entries are written immediately.
Unlike site logging, event log buffering is governed by a scheduled task (PurgeLogBuffer). If this task is not enabled or if the Scheduler is stopped, this setting has no effect and logging occurs as if this setting were unchecked. Event Logging is covered in more detail later in this chapter.
Use Friendly Urls
If checked, DotNetNuke invokes the FriendlyUrl Provider. By default, DotNetNuke installs a provider that produces "machine friendly" URLs that enable better indexing by search engines.
For developers, the default provider behavior is controlled by a rule file (siteurls.config) located in the web root.
The default modules provided with DotNetNuke work well with this provider. However, not every module may work well with any specific implementation of Friendly Urls. It is advisable to ensure that any module you employ works with your FriendlyUrl Provider. For more information on FriendlyUrls, see Chapter 8.
Help URL
The target URL for administrative help, including the Help button in the Control Panel and the Online Help menu item for administrative functions. If this field is blank, the Control Panel Help button is disabled and the Online Help menu item is not available on administrative functions.
By default, DotNetNuke provides context-sensitive online help for all standard modules and administrative features at the following site:
Enable Module Online Help
If enabled, an item for Online Help appears in every Module Actions Menu. This requires that a Help URL be configured in the Module Definitions for each module in use, although the developer may have provided this.
- Managing Portals as Host
You can reach the site settings for any portal through the Portals page (Host ð Portals) - Portals
From the Portals page you can create and maintain portals as well as generate a portal template for import into another DotNetNuke installation.Host-Only Site Settings Setting
Description
Expiry Date
When the expiry date for a portal is exceeded, a friendly message is displayed in the place of regular content (see Figure 5-10).
Hosting Fee
The default for this value is established in the Host Settings. This is primarily a display field that indicates the value appropriate for monthly renewal.
Disk Space
The default for this value was set in the Host Settings. It limits the amount of disk space available to a Portal Administrator through the File Manager.
Site Log History
The default for this value was set in the Host Settings. It keeps the site log for this portal truncated to the number of days indicated.
Premium Modules
Modules can be installed for use by any portal or can be limited to use in specific portals by setting them as "premium." This set of controls identifies which premium modules have been applied to this portal. You learn more about host management of modules later in this chapter.
- There's also a new control at the bottom of the Site Settings page for maintaining the list of aliases (domain names) for the portal
- Prior to version 3.0, all portal aliases were maintained in a comma-delimited string, which restricted the number of aliases that could be assigned. Additionally, it made processing based on individual aliases more complex and inefficient. Starting with version 3.0, portal aliases are maintained as a list of separate items. To add an additional portal alias, simply click Add New HTTP Alias and enter it in the text box provided. A portal can answer to an unlimited number of portal aliases.
- Adding a New Portal
- Parent Portals and Child Portals
- Portal Setup is where you put those concepts into practice by specifying either a Parent or Child portal. The only real distinction between a Parent and a Child portal is that a Parent portal alias has a simple URL attributed to it, whereas a Child portal consists of a URL and subdirectory name. An example of a valid Parent portal name is www.dotnetnuke.com. Alternatively, you can specify an IP address instead of a domain name (for example, 209.162.190.188). An example of a valid Child portal name is www.dotnetnuke.com/soccer, and an IP address can be substituted here as well (for example, 209.162.190.188/soccer). A Child portal can be turned into a Parent portal simply by adding a URL to its list of portal aliases.
- When a new Child portal is created, a physical directory is also created in the root of the web site with the Child portal's name. A page called subhost.aspx is copied into the directory as default.aspx. That's how DotNetNuke can implement addressing of the Child portal by the alias name (for example, www.dotnetnuke.com/soccer) without making modifications to IIS.
So why would you create a Child portal instead of a Parent? With a single registered domain name, you can create an infinite number of cname portals (for example, soccer.dotnetnuke.com) as long as your ISP supports a DNS wildcard for your domain. The most popular reason for creating a Child portal is the capability to emulate a single sign-on solution where credentials appear to be shared between portals. This is a common implementation in intranets where departmental portals are involved. Because Child portals exist in the same domain as the Parent portal, they can share access to a domain cookie, which preserves their logged-in status across subportals as long as the username and password are synchronized.
- Portal Templates
This feature enables you to select an existing portal, supply a name and description, and then generate a template that contains all the information necessary to re-create the portal on another installation (see Listing 5-1). Two files are generated in the
.template process, and.template .resources. .template is a plain-text file that contains a complete XML representation of the portal, its pages, modules, settings, and file structure. .resources is just a zip file of the portal root that is exported as content (if that option is selected).Portal templates are a powerful capability in DotNetNuke — but this capability is still "raw." This means that we've yet to provide user interface controls to direct how a template file is exported. At this point, template files contain everything including the kitchen sink! If you are creating templates, it would be wise to actually read through the generated file and make sure that there are no options specified that would be inappropriate for where you intend to apply them. As a standard XML file, this is a pretty simple thing to do and removing nodes that you don't want should work fine.
Templates provide a lot of power and promise for automatic configuration and for sharing of portal information. However, they should be used with care until they're more fully "cooked."
- Skins
The Portal Administrator and the Host each have their own version of the Skins page. As Host, both are visible and accessible to you, so it is essential that you understand which one you are working with.
- When using the Admin ð Skins page, you (as Host) always have access to the Upload Skin and Upload Container buttons. These are visible to the Portal Administrator only when the Skin Upload Permission is set to Portal). This enables you to upload skins and containers that are private to the specific portal — those files are uploaded to the Portal Root directory (\Portals\
). - When using the Host ð Skins page, the only difference is the target of the uploaded files. Skins and containers uploaded through the Host ð Skins page are installed in the Default Portal directory (\Portals\_default) and are available to every portal in the installation.
- Log Viewer
- As the Host, there are two specific differences in your view of the logs as well as a few additional features.
- First, your view includes exceptions (and any other events that are hidden from the Portal Administrator).
- Second, your view can contain log entries from all portals (if selected as an option). You also have access to some additional functions, including the capability to select and delete specific log entries, clear the entire log, and edit the log configuration.
-
Edit Log Settings Setting
Description
Logging Enabled
Turns logging on for the item. Items can be defined in the log settings without being enabled (for example, the default Scheduler event logging settings).
Log Type
Select one of the system-defined event types to log or the All category (as appropriate). It is acceptable to define more than one log setting for the same event or for overlapping events.
Portal
Indicate a specific portal (or All portals) for which this event is to be logged.
Keep Most Recent
Selecting All preserves all entries in the log. Any other value results in truncation of the log to the maximum number of items specified for the log type selected.
FileName
Multiple log files can be created. This can be handy for monitoring performance and/or activity related to a given portal or event type.
Email Notification Enabled
When enabled, the SendLogNotifications scheduled job assembles and sends e-mail according to the Edit Log Settings when it runs.
Occurrence Threshold
Specifies how often an event must occur to trigger e-mail notification.
Mail From Address
Sent-from address specified on outgoing e-mail.
Mail To Address
Sent-to address specified on outgoing e-mail.

- Module Definitions
- The Module Definitions page serves as the administration area for all of the modules installed in DotNetNuke. This page enables you to edit or delete existing module definitions and to add new modules. DotNetNuke comes with a number of basic modules preinstalled.
- What Is a Premium Module?
A module that has been marked "premium" is not freely available to all Portal Administrators. Non-premium modules automatically show up in the selector on every Portal Administrator's Control Panel, but premium modules require Host configuration on a per-portal basis. The Premium module setting enables you to hide special-purpose modules installed or developed for one client from those installed or developed for another. It also enables you to segment your product offerings, providing extra functionality at a "premium" rate.
Editing Module Definitions
- Each module definition is comprised of three sections: the module description, the module definitions, and the module controls
- The module description settings hold the basic properties of the module. The Module Name is used in the drop-down list of modules available to Portal Administrators on the Control Panel. The Description is displayed on pages that describe the modules (for example, Module Definitions page). The Version is used by module developers when issuing updates of their modules. The Premium setting determines if a module is available to all portals or only those specifically given access.
- A module can have any number of definitions. A definition directly matches to a single component of a module. For this reason, most modules usually have only one definition — they only add one component to the page.
Some modules may add many components to a page, with each component providing differing functionality but part of a logical group. For example, a blogging module might contain a calendar, a list of blog entries, and a search module. These would be configured as three different definitions, but would still belong under the same Module Name (for example, myblog).
Each definition may have a number of a controls associated with it. The controls directly map to ASP.NET user controls and each is marked with a name known as a key, which allows DotNetNuke to determine which control to load at runtime.
- Installing a New Module
- There are two methods for installing new modules into your DotNetNuke environment. The first is an automated install. The second is manually adding the module definition.
- File Manager

- The File Manager works for SuperUsers in the same way as it does for Portal Administrators, with a couple of minor exceptions.
- You learned previously that the Host can provide resources to all portals (for example, templates, skins, and so on) by making them available through the Host Root folder (that is, \Portals\_default). Where Admin ð File Manager provides access to each Portal Root, Host ð File Manager provides access to the Host Root
- There is no additional control for applying permissions, because Host Root permissions are not configurable. Only SuperUsers can add, change, modify, or delete files in the Host Root.
- Vendors
- Like the File Manager, the Host Vendor page works for SuperUsers in the same way as it does for Portal Administrators.
- The only difference between the Host Vendor page and the Portal Administrator Vendor page is the underlying vendor list. You maintain a vendor list separate from the individual portals, which is visible by all of them through banners.
- SQL

The Host SQL page is a handy utility for inquiry or remote maintenance. It provides for the processing of simple queries and returns results in a tabular format. It is also capable of executing compound queries and update queries when you select the Run As Script check box.
- Schedule

Carefully assess the items in the default schedule list, their settings, and enabled/ disabled status to ensure that they meet your specific operating requirements.
- Schedule Item Details
- Schedule History
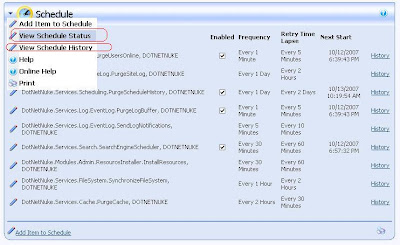
- Schedule Status
- Configuration
- The Scheduler has a couple of useful settings that can be manipulated in the application's web.config file.
-
Schedule Provider Configuration Settings Setting
Description
debug
When this is set to "true", a lot of log file entries are generated that help in debugging Scheduler-related development (that is, developing your own Scheduler items). Debugging multithreaded applications is always a challenge. This is one setting that can help you figure out why a task is or isn't getting run.
maxThreads
Specifies the maximum number of threads to use for the Scheduler (when in Timer Method mode). "-1" is the default, which means "leave it up to the Scheduler to figure out." If you specify a value greater than 0, the Scheduler uses that number as the maximum number of thread pools to use.
- Considerations
One limitation of the Timer Method mode of the Scheduler is that it cannot run 24/7 without help from an external program, the ASP.NET worker process. This is a constraint of ASP.NET, not of DotNetNuke. The web site's worker process periodically recycles according to settings in IIS or machine.config. Some hosts may have settings that recycle the worker process every 30 minutes (forced), whereas others may have more complicated settings, such as recycling the worker process after 3000 web site hits, or after 20 minutes of inactivity. It is this recycling of the worker process that shuts down the Scheduler until the worker process is started again (that is, by someone hitting the web site, which in turn starts up the worker process, starting up the Scheduler as well).
This functionality is actually a major benefit to web applications as a whole, in a hosted environment, because it keeps runaway applications from taking down the server. But it isn't without its drawbacks.
The bottom line is that the Scheduler will run 24/7 in the Timer Method mode as long as someone is visiting your web site frequently enough to keep the worker process active. It is during periods of inactivity that the worker process could possibly shut down. It is for this reason that you should carefully plan the types of tasks you schedule. Make sure that the tasks you schedule are not time critical — that is, don't have to run "every night at midnight" and so on. A more suitable task is one that runs "once per day" or "once every few minutes," and doesn't mind if it's not run during periods of inactivity.
The Request Method does not have the same dependency on the ASP.NET worker process. However, it is entirely dependent upon the timing of visitors to your web site. During periods of inactivity on your web site, scheduled jobs do not run.
- Languages

- Background
If the Portal Administrator edits a resource file, it will override all resources loaded from the default resource file. Even if the Host subsequently makes changes to the same set of resource strings, these changes will not be reflected in the portal, which has its own copy of the original resources.
- Using the Verifier makes managing localized resources much easier, but ultimately it is still up to you to handle localization. If this still seems like too much work, DotNetNuke provides a shortcut. Instead of localizing resources yourself, you can load resource packs that were created by someone else.
- Globalization
- Globalizing an application requires more than just having content appear in a specific language. Another aspect of globalizing an application requires that the application understand the time zone of the current user.
- To solve this problem, DotNetNuke stores all time in Universal Time Coordinated (UTC) format. Each user can associate a TimeZone with his or her profile. This setting is used to localize the time for the current user.
- Search Admin

- The Search Admin page enables you to configure certain aspects of the search engine features. It's important to remember that you are configuring the search for the entire installation, not just for any specific portal.
Specifying the Maximum and Minimum Word Length settings helps prevent you from indexing unreasonable terms. The internal default values are currently 50 and 4, respectively. If you deselect Include Common Words, the search engine won't bother indexing words that exist in the SearchCommonWords database table. That table has the capability to create common word entries for each locale (for multilanguage customization), although only the English language common words are included by default. Likewise, you can choose to Include Numbers or to ignore them when content is indexed.
Clicking the Update button saves your preferences. Clicking Re-Index Content causes the search engine to empty its tables and re-index the full content of all portals in the installation.
- Keeping It Current
When you learned about the Scheduler, you may have noticed a scheduled item for the search engine:
DotNetNuke.Services.Search.SearchEngineScheduler
If you want your portal's content to be current, it is essential that this job be configured to run periodically. As Portal Administrators add content to their web sites, it is not immediately available through site search. It does not become available until the new content is indexed the next time this job runs or until a SuperUser clicks the button to re-index content.
The engine that drives search also drives RSS syndication. Updated content is not reflected in syndication until the next time the search index is run.
- Background
- Starting in DotNetNuke 3.0, the search engine is fully integrated into the core application and modules are able to hook into this powerful functionality easily. This means that any third-party module can participate in full site search and/or content syndication, simply by implementing the search API . Currently, the core framework provides a search input module that performs full site search and a default search results page.
- Lists

- DotNetNuke includes a common utility that enables you to manage the content of lists (where appropriate) and to augment the lists to customize your installation.
The list manager is fairly straightforward, providing an index of the lists it is currently tracking as well as a summary of the entries and the capability to add new entries or edit existing ones.
- Not all lists are ones you should edit without an understanding of the potential impacts. For example, if you were to remove an entry from the Site Log reports list, it would prevent Portal Administrators from ever running that report on their portal. You might consider this a good thing if it was necessary to remove a report that was adversely affecting performance. However, adding a new item to that list would result in application errors because the Site Log report would not know how to process them.
- Skins
- As mentioned earlier in this chapter, the only difference between working with skins from the Admin menu and working with skins from the Host menu is the target location of the upload, which determines availability to other Portal Administrators.


